Since 2022 version, Eplan GUI items are accessible by means of a ribbon. In API this control is represented by following classes :
The ribbon is divided on tabs and these on command groups and commands.
All ribbon related classes are stored in Eplan.EplApi.Gui namespace. They correspond with types of ribbon items from GUI :

Here is an example of listing ribbon items (tabs, command groups and commands):
Please keep it in mind that some tabs are context sensitive, i.e they are open only when editor is visible.
Old menu and toolbars are no longer accessible. The equivalent of old menu point/toolbar button is now ribbon command :

In API, commands can be created in following places:
The classes corresponding to old GUI items i.e. Toolbar and Menu are currently deprecated, so it is highly recommended to migrate relevant code.
Following table shows how to create new ribbon items together with example code:
| Old GUI item | Old API method | New GUI equivalent | New API method | Example old code | Example new code |
|---|---|---|---|---|---|
| Main menu | Menu.AddMainMenu | RibbonTab | RibbonBar.AddTab | menu.AddMainMenu("API Tests A-N", Menu.MainMenuName.eMainMenuHelp,"AddingMessageAction", "AddingMessageAction", "First menu element", 1); | var ribbonTab = ribbonBar.AddTab("API Tests A-N"); |
| Popup menu | Menu.AddPopupMenuItem | RibbonCommandGroup | RibbonTab.AddCommandGroup | menu.AddPopupMenuItem("ActionExample - test2","ActionExample - test2 submenupoint1", "ActionExample", "status text", mainID, 0, false, false); | var commandGroup = ribbonTab.AddCommandGroup("ActionExample - test2"); |
| Toolbar | toolbar.CreateCustomToolbar | RibbonCommandGroup | RibbonTab.AddCommandGroup | toolbar.CreateCustomToolbar("SelectionSet", Toolbar.ToolBarDockPos.eToolbarLeft, 4, 1, true); | var commandGroup = ribbonTab.AddCommandGroup("SelectionSet"); |
| Menu item | menu.AddMenuItem( | RibbonCommand | RibbonBar.AddCommand , RibbonCommandGroup.AddCommand |
menu.AddMenuItem("UndoAction", "UndoAction"); menu.AddMenuItem("SelectionRecursive", "SelectionRecursiveAction", "", selectionSetID, 1,false, false); |
ribbonBar.AddCommand("UndoAction", "UndoAction"); commandGroup.AddCommand("SelectionRecursive", "SelectionRecursiveAction"); |
| Toolbar button | toolbar.AddButton( | RibbonCommand | RibbonCommandGroup.AddCommand(…,index) | toolbar.AddButton("SelectionSet", Int32.MaxValue, "SelectionOneItemAction","C:\\myicons\\0.ico", "SelectionOneItemAction"); | commandGroup.AddCommand("SelectionOneItemAction", "SelectionOneItemAction", 0); |
Here is also a list of other old methods and their new conterparts :
| Old method | New method |
|---|---|
| Toolbar.ExistsToolbar | RibbonBar.Tabs.Any(by LINQ) RibbonBar.GetTab RibbonBar.GetDefaultTab |
| Toolbar.GetButtonAction | RibbonCommand.ActionCommandLine |
| Toolbar.GetButtonToolTip | RibbonCommand.TooltipText |
| Toolbar.GetCountOfButtons | RibbonCommandGroup.Commands.Count |
| Toolbar.GetPersistentButtonId Menu.GetCustomMenuId GetPersistentMenuId |
RibbonCommand.ID |
| Toolbar.RemoveButton | RibbonCommand.Remove |
| Toolbar.RemoveCustomToolbar | RibbonCommandGroup.Remove |
| Menu.IsActionChecked | RibbonCommand.IsChecked |
| Menu.IsActionEnabled | RibbonCommand.IsEnabled |
| Menu.RemoveMenuItem | RibbonTab.Remove RibbonCommandGroup.Remove RibbonCommand.Remove |
ContextMenu class is not affected by this change, i.e everything should work as before 2022 version.
For more information, please refer to chapter "The New Ribbon" of Eplan Help.
Ribbon command actions can be now created with .svg icons. There is a list of standard CommandIcons accessible by name or index number.
Furthermore, below examples present also how to use custom icons, which can be added by specifying path to .svg file or providing icon content in string format.
Adding standard icons
Adding custom icons
Above examples results in RibbonBar

RibbonCommandInfo
Ribbon command actions can be now created with a RibbonCommandInfo-object. This object holds all necessary and optional properties.
Optional properties are Description, Tooltip, Icon, IndexButtonPosition, MultiLangButtonText, MultiLangDescription, MultiLangTooltip.
The multilanguage properties are used over the non-multilanguage properties if they are not empty.
IndexButtonPosition is used to define at which position in a RibbonCommandGroup is positioned.
Add existing EPLAN actions to a custom CommandGroup
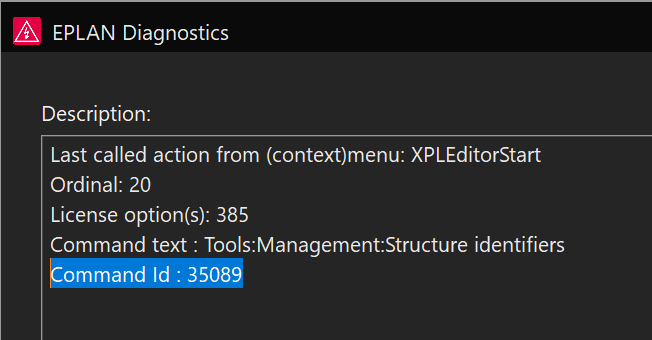
It is possible to add existing EPLAN ribbon command actions to a custom CommandGroup via their Command.ID.
The corresponding internal icon is automatically added to the action.
To find the correct Command.ID value for the command, you can check the description log in the EPLAN Diagnostics dialog after calling this action from the ribbon (to show the Diagnostics Dialog press [Ctrl] + [VK_OEM_5]. [VK_OEM_5] corresponds to the [^] key on a German keyboard or to the [\] on a United States 101 keyboard):
SVG Icons limitations
Our UI libraries have SVG support with the following limitations:
• Scripts, interactions and external objects are not implemented due to security reasons.
• Animations, videos, sounds and internal images are not implemented.
• Since SVG icons should be small and quickly rendered, we disabled the following SVG elements that may significantly affect a drawing performance:
<pattern>
<color-profile>
<hkern>
<hatch>
<hatchpath>
all effects, blend mode and filters.
• Compressed SVG files (SVGz).
It is strongly recommended to use a simplified ("optimized") SVG only: all elements such as texts or shapes should be converted to paths and all paths should be combined.
The simplified SVG is small and fast-drawing. In addition, in this case, it will be very hard to make a "reverse engineering" for your media.
