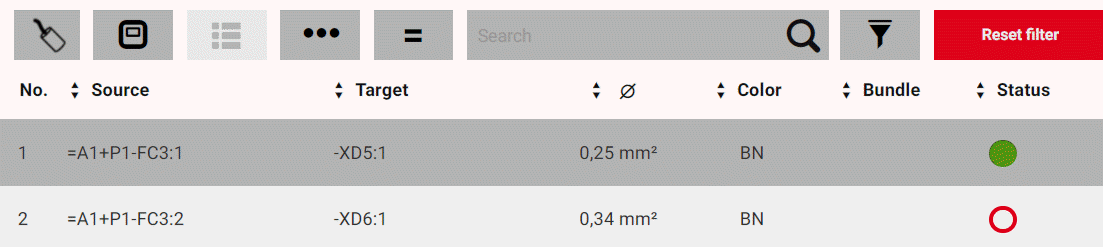
The connection list is the main window of the application and forms the basis for your installation work. In the connection list, which has a table structure, the routing connections that exist in a project are available for editing of the wiring status after a project and the selection of the desired layout space has been opened or continued. The properties of the routing connections are used as column headers of the list.
If a project file of the *.EPDZ file was loaded with a 3D mounting layout, depending on the structure of the project, the routing connections can be displayed depending on the selection connection type, the layout space, enclosure or mounting site.
From this connection list it is also possible to have the connection situation in the selected layout space in the 3D view displayed for each routing connection.
Columns of the connection list
The number and the sequence of the displayed columns in the header of the connection list is available to you in the selectable schemes whose configuration can only be carried out by your administrator. The selection of the schemes is offered to you in the Settings of the application.
If routing connections of the type Wire (single conductor), Wire jumper or Tube or Cable are contained in the project to be edited, the following connection properties are available overall as columns in the connection list, whose combination and number depends on the selected scheme:
|
Column |
Description |
|---|---|
|
No. |
Contains a consecutive line number. |
|
Source / Target |
Shows the device tag including the connection point designation of the item that is the source / target of the connection. If they cannot be displayed in one line, device tags which are too long will have a line break. NoteIf the device tag of the target contains the same structure identifier as the source, the part of the device tag which is identical with the source is not displayed. |
|
Designation |
Shows the connection designation of the routing connection. |
|
Æ |
Shows the cross-section or diameter of the routing connection. |
|
Length |
Shows the length of the routing connection. |
| Color |
Shows the color of the routing connection. |
|
Bundle |
Shows the association of the routing connection to a certain bundle. |
|
Chain |
Shows whether the routing connection is a component of the daisy chain. The Chain property is displayed instead of the Bundle property, if the Daisy chain option was selected in the selected scheme for the column configuration of the list. |
|
Routing track |
Indicates the full device tags of the wire ducts through which the routing connection passes. |
|
Status |
Shows the installation status of the routing connection in the form of a circular icon with different symbols. The representation of the status icons can be changed. A standard representation and an alternative representation are available. The following statuses - shown in the standard representation - are differentiated:
|
 Routing connection has to be uninstalled.
 Routing connection has been removed.
If connections of the type Cable are selected, the following connection properties are available as columns in the connection list in addition to the sequential number and the status - irrespective of the selected scheme:
|
Column |
Description |
|---|---|
|
Connections |
Shows the number of the cable connections (cable conductors) contained in the cable. |
|
Cable DT |
The full device tag of the cable is displayed. |
|
Cable type |
Indicates the cable type. |
|
Length |
Indicates the length of the cable to be routed. |
Sorting options
In the header row of the connection list, arrow buttons are available in each column with the exception of the No. column. These can be used to sort each connection property with regard to the displayed property values.

Search options and filter options
The display of the connection list can be reduced to specific routing connections. For this purpose a search and filter bar is located above the header of the connection list.

In the search and filter bar you have the possibility to select both connection types and/or enclosures within a layout space as well as search and/or filter for values of specific properties of routing connections. Within the displayed search or filter result you can select selected routing connections for editing without having to open the Detail view of each connection. During the search it is also possible to select an "If unequal" option which can be used to negate the selection. An extended filter functionality also allows filtering for potential-specific connection properties.
Selection of connection types
As of Version 2.9 EPLAN Smart Wiring supports the editing of different connection types - if available in the selected layout space of the project. The selection of connection types is carried out via the button at the far left in the search and filter bar. The selectable connection types are identified by the following symbols:
 Wire (single conductors)
 Cables
 Wire jumper
 Tube
Tube
Notes
- If the selected layout space in the project only contains routing connections of a connection type, the button is grayed out and cannot be activated.
- If wire jumpers are a component of a daisy chain, they are also displayed in the connection list when the connection type Wire (single conductor) is set.
Enclosure selection
If the opened or continued project has layout spaces with multiple enclosures, only the routing connections of the selected enclosure can be displayed via the  button in the connection list. Detailed information is available on the help page Selecting layout spaces, enclosures and mounting sites.
Searching and filtering
The following buttons are available for searching and filtering in the connection list:
- The Search
 field allows searching by entering a string.
 - With the
 ("If not equal to" search) button you can determine during the search whether the string entered in the search field is to be contained or not under the property values of the routing connections.
 - The filter button
 activates the selection of filter values at the connection properties provided for filtering.
 - With the button
 you can use an extended filter functionality which you can use to filter the routing connections according to the connection properties Potential value and Potential type, in as far as this information is available.
During searching and filtering different connection properties are considered depending on the selected connection type:
Considered properties when searching
|
Connection type |
Properties |
|---|---|
|
Wire (single conductor), wire jumper, tube |
|
|
Cable |
|
Considered properties when filtering
|
Connection type |
Properties |
|---|---|
|
Wire (single conductor), wire jumper, tube |
|
|
Cable |
|
Notes
- Note that for the selected connection type "Cable" in the connection list, you cannot search and/or filter for the connection properties of the individual cable connection (cable conductors).
- Searching and filtering can only be carried out for connection properties marked above with an *, if they are stored in the project file of the type *.EPDZ. These properties are only available in the detail view of the routing connection.
- If the project file contains the connection properties Potential value and Potential type, this is signaled in the detail view of the affected routing connections by a flash symbol in the indicated wire graphic between the source and target connection. The values of both properties are furthermore displayed in the wire graphic.

Simultaneous status editing of routing connections within the search and/or filter result
If a search was performed and/or a filter was applied in the connection list search, it is possible to edit the status of several routing connections simultaneously which are displayed in the search and filter result within the connection list. The  button is available to this purpose in the filtered connection list. This displays a menu with the following status icons (the standard representation is shown):
 Partially installed (source installed, target not installed)
 Partially installed (source not installed, target installed)
 Not installed (source and target not installed)
 Installed (source and target installed)
 Locked for editing
If the alternative representation for the status icons was selected in the settings, the following icons are differentiated in the menu as shown below:
 Partially installed (source installed, target not installed)
 Partially installed (source not installed, target installed)
 Not installed (source and target not installed)
By selecting the desired icon the corresponding status of the displayed routing connections can be assigned in a single step. In the process, check boxes can be used to deselect individual routing connections from the search and/or filter result and include them again. The assignment can be undone by using the  button. Note that undoing is only possible until another routing connection is edited. The status editing also encompasses the connection types Cable, Wire jumper and Tube.
 Sorting routing connections
Preconditions
- You have opened or continued a project of the type *.EPDZ, *.XLS / *.XLSX.
- You have selected a layout space, an enclosure in the layout space or a mounting site in the enclosure. (Only required for projects of the type *.EPDZ.)
Procedure
- In the header of the connection list click or tap repeatedly on the arrow button of the column before the desired property and determine with this how the routing connections should be sorted with regard to the displayed values.
- The state of the arrow button changes and produces the following sorting:
|
State |
Sorting |
|---|---|
|
|
Alphanumerically ascending |
|
|
Alphanumerically descending |
|
|
As specified |


Notes
- The routing connections can be sorted according to the values of multiple properties.
- The sorting settings are saved user-independently for each opened project instance.
Selecting a connection type
Preconditions
- You have opened or continued a project of the *.EPDZ type.
- You have selected a layout space, an enclosure in the layout space and/or a mounting site in an enclosure.
- Routing connections of at least two different connection types are contained in the selected layout space.
Procedure
- Select the button on the far let in the search and filter bar. (For example, click or tap on , if wires (single conductors) are currently displayed in the connection list.)
- In the menu opened select the menu item with the desired connection type. (Select, for example, the connection type "Wire jumper".)
- After that the connection list only shows the routing connections of the selected connection type.
- The symbol of the button changes according to your selection. (For example, the symbol is displayed for the connection type "Wire jumper" .)
- In the 3D view the connection situation of all connections of the selected connection type is displayed.
Finding routing connections
Preconditions
- You have opened or continued a project of the type *.EPDZ, *.XLS / *.XLSX.
- You have selected a layout space, an enclosure in the layout space or a mounting site in the enclosure. (Only required for projects of the type *.EPDZ.)
Procedure
- In the search and filter bar enter the desired search term in the input field with the magnifier.
- Click or tap the magnifier.
- The search begins.
- In the input field of the search, an "X" is displayed instead of the magnifier.
- In accordance with the search term and the search mode, the display of the connection list is reduced to the number of found list entries.
- A check box is displayed in front of each list entry. Furthermore the button is shown. These operating elements are intended for the simultaneous editing of the installation status of filtered routing connections.
- If the entered search term is unique, the detail view of the found routing connection is automatically opened for editing.
- If you want to search for routing connections referenced by source connection and target connection, specify the search mode by using the button to the left of the entry field by clicking or tapping it several times in a row.
- The state of the button changes and influences the search in the connection list as follows:
|
State |
Search result |
|---|---|
|
|
Only device tags of the source are considered. |
|
|
Only device tags of the target are considered. |
|
|
All properties of the routing connections including the device tags of the source and the target are considered. This is the default setting during the search. |


Invert search
By default the string which is entered in the search field is considered during the search in the connection list. This is displayed with the button. You can invert the search by means of this button so that in the connection list all strings in the property values of the routing connections are considered which do not contain the strings entered in the search field.
Procedure
- Click the button .
- The button changes the color and shows a "not equal" sign
 .
. - Enter the string in the search field and start the search using the magnifier.
- As the search result the connection list now shows all routing connections in whose property values the string entered in the search field is not contained.
- If you want to invert the type of search, click the button again.
Deleting search terms
Preconditions
- You have performed a search in the connection list.
- A term is entered in the input field with a magnifying glass in the search and filter bar of the connection list.
Procedure
- In the input field click or tap "X" or the button [Reset filter].
- The search term is deleted.
- The magnifier is displayed again in the entry field.
- The connection list is shown again in the initial state.
Note
If one or more filters were defined in addition to the search, the filter settings remain after the search term has been deleted.
Filtering routing connections
Preconditions
- You have opened or continued a project of the type *.EPDZ, *.XLS / *.XLSX.
- You have selected a layout space, an enclosure in the layout space or a mounting site in the enclosure. (Only required for projects of the type *.EPDZ.)
Procedure
- In the search and filter bar of the connection list click or tap the button .
- The filter mode is activated and the button changes its color (
 ).
). - At all connection properties for which a filter can be applied, small filter symbols are displayed instead of the arrow button (
 ).
). - Click or tap in the header of the connection list on the column with the desired connection property.
- A list with all available filter values expands below the column.
- The All entry is colored in red.
Example
Expanded list with filter values for the property Cross-section / Diameter.
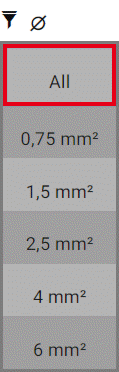
- Click or tap the desired value you want to filter.
- The column with the connection properties is framed in red.
- The filter is applied directly and the display of the connection list is reduced correspondingly to the routing connections to which the filter applies.
- A check box is displayed in front of each list entry. Furthermore the button is shown. These operating elements are intended for the simultaneous editing of the installation status of filtered routing connections.
- If the selected filter value is unique, the detailed view of the found routing connection is automatically opened for editing.
- If you want to filter for another value of the connection property, click or tap the column again and then select the All value in the expanded list.
- The filter now applies to all values of the property. The number of routing connections in the connection list is modified in accordance with the setting.
- Click or tap the column again and select the filter value from the expanded list.
- Define filters for further properties as required.
Notes
- All filters can be applied in combination. In that case the display of list entries is always dynamically customized to the previously selected filter value.
- Your administrator has the possibility to influence the filter behavior for the combination of filters by activating a Smart filter. If this type of filtering is set, you as the finisher can only select the property values referring to the previous filter result for filtering in further properties. If this functionality is deactivated, you can select all values available in the project in the respective properties for filtering.
- In addition the sorting, search and filter functionalities in the connection list can be applied combined.
- The filter settings are saved user-independently for each open project instance.
Using extended filter functionality for potential-specific connection properties
Preconditions
- You have opened or continued a project of the *.EPDZ type which contains information on the connection properties Potential value and Potential type at the routing connections.
Procedure
- In the search and filter bar, click or tap the button .
- The Filter dialog opens.

- Select the desired filter value from the drop-down lists Potential value and Potential type and save the settings.
- The filter is activated. As a result a red frame
 is drawn around the filter surface.
 - The number of routing connections in the connection list is reduced according to the settings.
Note
With an activated filter for the potential-specific connection properties, the connection list can be additionally filtered for all connection properties which you activate via the button .
Deleting filters and deactivating filter modes
Preconditions
You have activated the filter mode and defined filters for one or more connection properties in the header of the connection list.
Procedure
- In the search and filter bar click or tap on the button [Reset filter].
- All filters are deleted simultaneously, the filter mode is activated for other filter settings. If the extended filter was applied for potential-specific properties, it is also deleted and simultaneously deactivated.
- The connection list is displayed unfiltered again.
- If you want to deactivate the filter mode, click or tap the button.
- The button changes its color ().
Notes
- An individual filter can be deleted by clicking or tapping the column colored in red of the respective connection property in the header and then selecting the All value from the drop-down list.
- With the button [Reset filter] you now also additionally have deleted the saved sorting settings user-independently for each opened project instance.
Editing installation status of filtered routing connections simultaneously
Preconditions
You have performed a search and/or defined filters for one or more connection properties in the header of the connection list.
Procedure
- In the filtered connection list use the check boxes to specify before each list entry which routing connections are to be edited simultaneously. Deactivate or activate the check boxes accordingly.
- In the connection list click the button .
- Click or tap the desired status icon in the menu opening
 .
. - The selected status (not installed),
 (installed), (partially installed: source installed, target not installed), (partially installed: source not installed, target installed) or
  (locked for editing) are now assigned at the same time to all the marked routing connections. At a partial installation the status of the entire routing connection is displayed with the icon
  .
. - If you want to undo the assignment, click the button .
Note
Note that undoing is only possible until another routing connection is edited.
Locating routing connections in the 3D view
Preconditions
- You have opened or continued a project of the *.EPDZ type.
- You have selected a layout space, an enclosure in the layout space or a mounting site in the enclosure.
Procedure
- Mark any routing connection in the connection list.
- In the 3D view the wiring situation and the complete course of the marked routing connection in the mounting layout of the selected layout space is displayed.