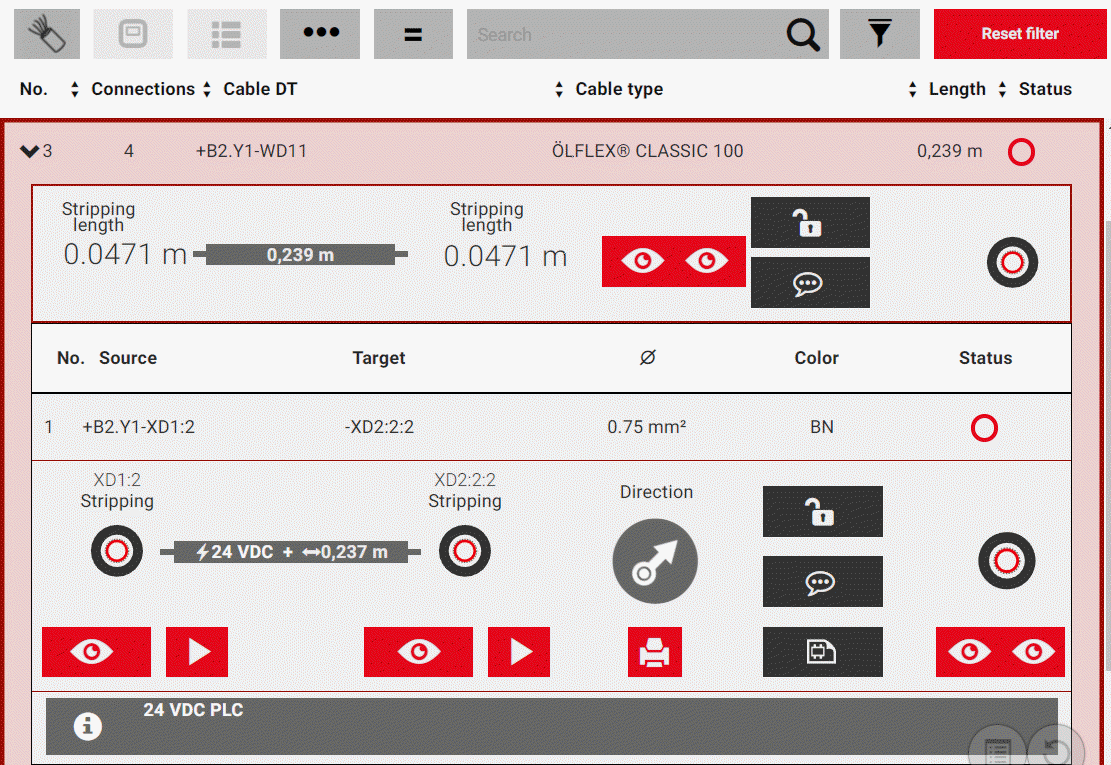
As soon as you mark a row with a routing connection in the connection list, the field of the respective row expands and offers a detailed display of all existing connection point information and routing information. In this detailed view the routing connection is visualized by connection point symbols of the source and target as well as by a connection symbol. In the detail view of cables this is only the case for the connections of the cable, for which a separate detail view can be opened respectively.
The routing connection in the detail view can be edited by assigning an installation status at the source connection point and at the target connection point. Other buttons in the detailed view enable you to visualize the wiring situation in the mounting layout in the 3D view, and call it up in the form of schematic pages or for example send a Connection comment in case of an error.
From the detail view you can also print connection properties of routing connections for the labeling of wires (single conductors), wire jumpers or hoses. In the case of cables on the other hand, this is only possible for the individual connections of the cable.
If the Rittal solution "Wire Station" with integrated length-cutting machine is integrated in the manufacturing process, the displayable button allows the transfer of the data of the selected routing connection to a length-cutting machine which manufactures the corresponding wire.
Manufacturing relevant additional information in the detailed view
With the loaded project file the engineer can store additional manufacturing-relevant information at each routing connection. They become visible for you after the detailed view has been opened.
The following information can be displayed at routing connections, which are assigned to the connection types Wire, Wire jumper or Tube:
- Displayed DT and connection point designation source / target
- Connection designation
- Length with unit
- Wire termination processing source / target
- Connection: Type designation
- Remark
- Routing direction source / target
- Minimum tightening torque
- Maximum tightening torque
- Socket size.
Buttons and display elements
To receive more information about the user interface in the detailed view, click or the tap the individual buttons and display elements between the two red lines on the graphic displayed below.
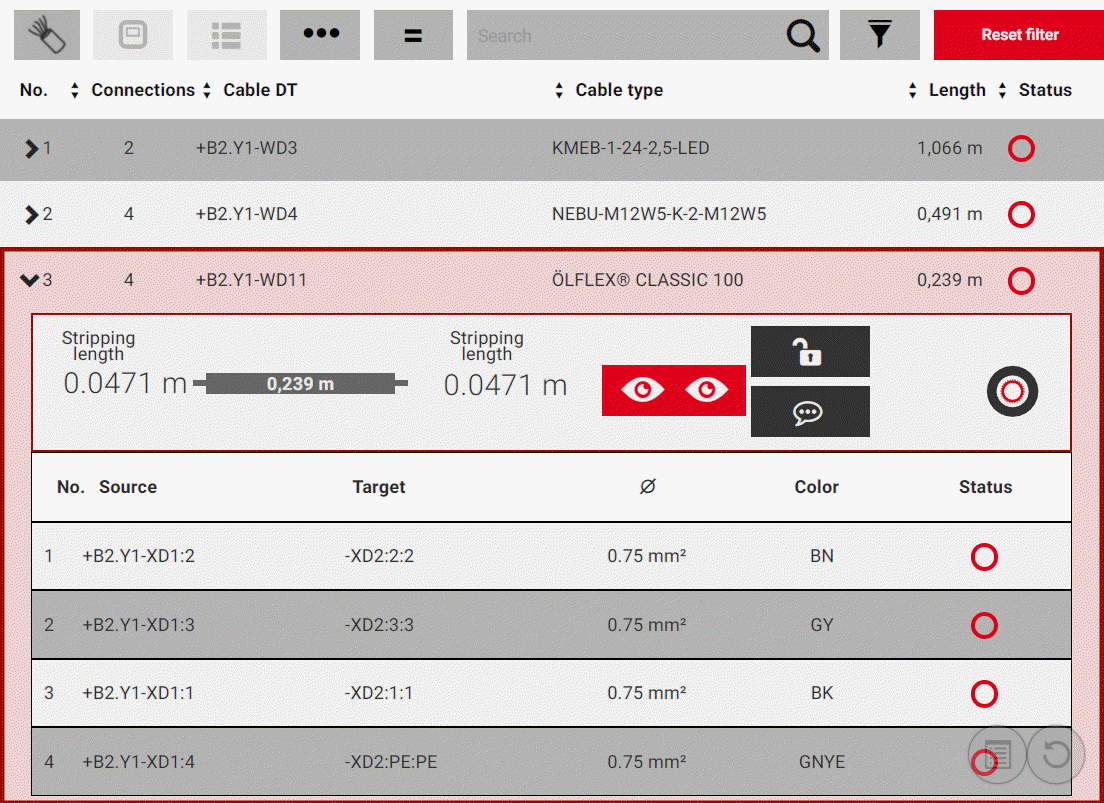
Detailed view during selection of the connection type "Cable"
If you have selected a layout space in the project that contains cables, and have selected the connection type Cable in the search and filter bar of the connection list, all routed cables of the layout space are displayed in the connection list.
By using the arrow ![]() at the left-hand margin of a list entry you can open the detailed view of the respective cable and have the individual connections of the cable (cable wires) displayed.
at the left-hand margin of a list entry you can open the detailed view of the respective cable and have the individual connections of the cable (cable wires) displayed.
The following manufacturing-relevant information can be contained in the detailed view of the cable, provided that they were stored in terms of construction in the project file:
- Source: Stripping length
- Target: Stripping length
- Length (full)
- Number of connections
- Remark.
In the detailed view of cables it is possible to lock and unlock the cable and the cable connections contained in it with the lock for the assignment of an installation status. In addition, the connection situation of the routed cable can be visualized in the 3D view and the cable can be installed as a higher-level routing connection including all contained connections.
If you mark one of the cable connections contained in the cable, the detailed view of the individual cable connection with all functionalities opens that you also have for wires (single conductors), wire jumpers and hoses.
 Tracking routing connections in the 3D view
EPLAN Smart Wiring offers the possibility to track the routing track of a selected routing connection in the 3D view:
Preconditions
- You have opened or continued a project of the *.EPDZ type, a layout space, an enclosure in the layout space or a mounting site in the enclosure.
- You have marked a routing connection in the connection list so that the detail view of the routing connection is open and the entire connection situation of the routing connection is shown in the mounting layout in the 3D view.
Procedure
- In the detail view of the routing connection click or tap the
 button at the connection symbol of the source or of the target.
 - In the 3D view the connection situation at the source or target of the marked routing connection is displayed.
- Click or tap the
 button at the connection symbol of the source or target.
 - In the 3D view an animation is started that shows the complete routing track of the routing connection in the mounting layout from the source to the target or from the target to the source respectively.
- While the animation is running the symbol of the button (
 ) changes.
 - Click or tap to stop the running animation at any point.
- The button takes on the previous state again.
- Click or tap again to continue the animation.
- If you want to view the complete wiring situation of the routing connection from source to target in the 3D view again, click or tap the
 button.
Tip
Use the button also when viewing special connection situations, for example when tracking a routing connection from the front / rear of a mounting panel to the rear / front of a mounting panel located behind it. With the button you always receive an optimized viewing angle in the 3D view on the routing connection in the layout space.
Tracking routing connections on schematic pages
If you are editing an EPLAN Pro Panel project with a 3D mounting layout that contains schematic pages, it is possible to have the schematic pages with the form of the routing connection displayed as an additional guidance.
Note
Note that only schematics of EPLAN Pro Panel Version 2.8 or higher can be displayed.
Preconditions
- You have opened or continued a project of the *.EPDZ type.
- The connection list shows the connections of the selected layout space, an enclosure in the layout space or a mounting site in the enclosure.
- A routing connection is marked in the connection list, so that the detailed view of the routing connection is opened.
- The project has schematic information, which can be seen at the selectable button
 in the detailed view.
Procedure
- In the detailed view click or tap the button.
- At the right-hand margin of the screen the Schematics flyout is displayed.
- Depending on the form of the routing connection different numbers of schematic pages with the complete page name are listed in this flyout.
- Click or tap the desired page name in the flyout.
- The schematic page is opened in a separate display window.
- The item that is the source and / or the target of the routing connection is highlighted by a red rectangle.
- At the right-hand margin a preview for further schematic pages of the project appears, if the selected routing connection is part of these pages.
- If you want to zoom in or zoom out of the schematic, use the buttons at the lower right-hand corner of the display window or scroll in the opened page using the mouse wheel.
- If necessary, open a further page by marking it in the preview.
- Close the display window by clicking or tapping the cross in the title bar.
- Hide the flyout by clicking or tapping the arrow symbol or in the detailed view of the routing connection again on the button.
Editing routing connections
Preconditions
- You have opened or continued a project of the type *.EPDZ or *.XLS / *.XLSX.
- You have selected a layout space, an enclosure in the layout space or a mounting site in the enclosure. (This only applies for projects of the type *.EPDZ.)
- You have selected a connection type. (This only applies for projects of the type *.EPDZ.)
- A routing connection is marked in the connection list, so that the detailed view of the routing connection is opened.
The editing of a project in EPLAN Smart Wiring is based on changing the installation status of all routing connections of all connection types from "Not installed" to "Installed". The status assignment is carried out by means of the connection symbols in the detailed view. Depending on the working method in your manufacturing team EPLAN Smart Wiring supports the following procedures:
- Separate installation of the wire terminations of the routing connection at the source and the target
- Install the complete routing connection, without consideration of the installation status at the source and the target.
Note
Note that for the selected connection type Cable only the wire terminations of the individual cable connections can be installed separately.
Installing the wire terminations of the routing connection separately
Procedure
- In the detailed view of the selected routing connection click or tap the connection symbol of the source.
- The installation status changes from "Not installed"
 to "Installed"
  .
. - The complete routing connection that is represented by the button at the right-hand margin of the detailed view changes its installation status from "Not installed" to "Partially installed"
 .
. - Click or tap the connection symbol of the target.
- The installation status also changes from "Not installed" to "Installed".
- The complete routing connection now takes on the installation status "Installed" .
- The detailed view is closed, and the detailed view of the next routing connection is automatically opened for editing.
- Repeat Steps 1 and 2 for all further routing connections.
- Confirm the message coming up after the completion of the installation work.
Installing a complete routing connection
Procedure
- In the detailed view of the routing connection click or tap the connection symbol on the complete right.
- The installation status of the complete routing connection and the connection symbols at the source and target change from "Not installed" to "Installed" .
- The detailed view is closed, and the detailed view of the next routing connection is automatically opened for editing.
- Repeat the step for all other routing connections and confirm the message after completion of the installation work.
Notes
- If you have performed a search in the connection list and/or applied a filter, EPLAN Smart Wiring enables Simultaneous status editing of routing connections within the search and/or filter result.
- If you have completed the installation of all routing connections within a layout space, enclosure or mounting site and you want to change the status of an installed routing connection, you receive a corresponding message which you need to confirm. The message is only displayed if your administrator has activated the output of the message.
Locking / unlocking routing connections
If a connection in an enclosure cannot be installed - for whatever reasons - the associated routing connection in the detailed view can be locked. In that case an assignment of the installation status "Installed" or "Not installed" at the source or the target of the routing connection is still possible but not for the whole routing connection.
Procedure
- In the detailed view click or tap the
 button.
 - The lock symbol at the button changes (
 ).
). - The installation status changes to "Locked for editing"
 .
. - Click the button with the lock again if you want to unlock the lock for the editing of the routing connection.
Printing connection properties for the labeling of wires
EPLAN Smart Wiring makes it possible to print the properties of each routing connection to place the data for the labeling at the wire really to be installed, for example in the form of a label. The printing functionality can be called up via the printer symbol from the detailed view of the selected routing connection.
Note
Note that with the selected connection type Cable the printing functionality is only available in the detail view of a cable connection.
Preconditions
- You have opened or continued a project of the *.EPDZ type.
- The connection list shows the connections of the selected layout space, an enclosure in the layout space or a mounting site in the enclosure. (This only applies for projects of the type *.EPDZ.)
- You have selected a connection type. (This only applies for projects of the type *.EPDZ.)
- The output data, the font size and the font for printing are specified in the Settings for the labeling of connections.
- A routing connection is marked in the connection list, so that the detailed view of the routing connection is opened.
Procedure
- Click or tap the button with the printer symbol
 .
. - Select the next dialog of the printer, the page range and the number of the copies to be printed.
- If necessary, specify further printer settings.
- Click or tap Print.
- Printing begins
Output data of routing connections for the Rittal solution "Wire Station" with integrated length-cutting machines
EPLAN Smart Wiring allows you to output data for routing connections for the Rittal solution "Wire Station" with integrated length-cutting machines for automated wire fabrication. The data is saved as a CSV file in a directory specified by the administrator.
Preconditions
- You have opened or continued a project of the *.EPDZ type.
- The connection list shows the connections of the selected layout space, an enclosure in the layout space or a mounting site in the enclosure. (This only applies for projects of the type *.EPDZ.)
- You have selected a connection type. (This only applies for projects of the type *.EPDZ.)
- A routing connection is marked in the connection list, so that the detailed view of the routing connection is opened.
Procedure
- Select the menu item Settings > Installation mode.
- Activate the Wire Station option in the Installation mode menu.
- The
 button is shown in the detail view of the routing connection.
 - Click the button.
- The data is saved and output; a corresponding message is displayed.
- The wire is manufactured.
- Deactivate the Wire Station option in the settings to hide the button in the detail view of the routing connection.
Further information
Sets / shows the status of the routing connection at the source.
Sets / shows the status of the routing connection at the target.
Sets / shows the status of the complete routing connection.
General routing direction from the source to the target.
Locks / unlocks the routing connection for the status editing.
Enables sending a comment about the routing connection to the receiver.
Enables the display of schematic pages.
Shows the connection situation of the routing connection at the source.
Starts an animation, which tracks the routing track of the connection from the source to the target.
Shows the connection situation of the routing connection at the target.
Shows the connection situation of the complete routing connection.
Starts an animation, which tracks the routing track of the connection from the source to the target.
Starts an animation which tracks the routing track of the connection from the target to the source.
Enables printing connection properties for the labeling of labels.
Allows the manufacturing of a wire by means of the Rittal solution "Wire Station" with integrated length-cutting machines.
Shows a comment when this has been entered in EPLAN Pro Panel and was read via the EPDZ file into EPLAN Smart Wiring.
Shows a value for the min. / max. torque and the socket size of the tool at the source if this information has been entered in EPLAN Pro Panel and was read into the EPDZ file via EPLAN Smart Wiring.
Shows a value for the min. / max. torque and the socket size of the tool at the target if this information has been entered in EPLAN Pro Panel and was read into the EPDZ file via EPLAN Smart Wiring.
Shows the status of the complete routing connection.